Photobucket Photobucket
Showing posts with label Fun Food Idea's. Show all posts

February 9, 2013

Cookie Dough Truffle Bites and Perfect Dipping Chocolate Recipe

Every person I know has a small guilty pleasure-eating chocolate chip cookie dough...it's just so good! 
This recipe is one of those marvelous Pinterest finds, is  quick to put together, and has just 5 ingredients!  You gotta love that!
It's a great treat for a girls night out, a get well basket, bridal shower, or a thank you for that special friend!
These truffles taste just like chocolate chip cookie dough but are safe to eat without worry of food poisoning from raw eggs.  They freeze really well, so you can make a batch and enjoy a few every day! Just let them sit out for 10-15 minutes before inhaling them!

COOKIE DOUGH TRUFFLE BITES

1 c. butter, softened
1 1/2 c. packed light brown sugar
1 tsp. vanilla extract
2 c. flour
1 c. miniature chocolate chips
1 1/2 c. Perfect dipping chocolate (optional)
(see the recipe below)

In a large mixing bowl cream the butter and sugar together until light brown and fluffy.
Add remaining ingredients and mix very well.
Roll the dough into 1" balls (about the size of an un-shelled walnut). I started out rolling the bites by hand, but with time pressures, I switched to a cookie dough scoop to speed up the process.

Refrigerate until firm, 30 minutes or longer (I left mine overnight because my schedule got too tight to finish all at once, and they were absolutely perfect).
At this point they are ready to eat, but you can also drizzle melted chocolate over them, or dip them in a delicious chocolate coating..  I've made these a couple of different times, and I like them all three ways-plain, drizzled, and dipped!
I've added my recipe for homemade dipping chocolate (that tastes so much better than chocolate candy coating) below.


PERFECT DIPPING CHOCOLATE


1 1/2 c. semisweet chocolate chips (use pure chocolate chips)
2 Tbsp. Crisco shortening (no substitution)


Directions:
Remove the chilled candy from the refrigerator about 10 minutes before coating (dipping cold centers can result in cracked coating).
Place the chocolate chips and shortening in a 2-cup measuring bowl.

Place in the microwave and on 50% power, heat for 30 seconds, stir gently, and repeat the process until the chocolate is melted and smooth.  Stir and stir between heating times because the chocolate may appear un-melted, but it will surprise you how quickly it smooths out (do not use butter, margarine or oil).
If you are unsure of using this method, here are the original directions for this recipe I've had for years.
~Place the bowl into a larger bowl which contains very warm water (about 100-110 degrees) the water should reach only halfway up the 2-cup bowl with the chocolate (DO NOT LET EVEN 1 DROP WATER MIX WITH CHOCOLATE!).
Stir mixture constantly with a small spatula until the chocolate is melted and the mixture is smooth (this should take about 16-18 minutes).
If the chocolate becomes too thick for dipping, place the bowl containing the chocolate over the top of a bowl that has very hot water in it.  Stir until the chocolate has thinned back to the consistency you want.~
This method is obviously a pain, so you can also melt the chocolate in a double boiler, which is far easier-lol.
TIPS ON HOW TO WORK WITH DIPPING CHOCOLATE.
Avoid all types of moisture when melting the chocolate, any steam or drops of moisture can cause the mixture to "seize" or become very firm, crumbly and grainy.   If this occurs it can be corrected by stirring in 1 tsp. shortening for each 2 ounces of melted chocolate.
Store the chocolate tightly wrapped in a cool dry place, do not refrigerate.
Recipe source for the cookie dough bites: DisneyFamily.com

Pin It

January 30, 2013

Almost Guilt Free Cake Batter Dip

Of course I found this recipe on Pinterest, and the title of the pin {Skinny Cake Batter Dip} immediately caught my eye.  I love a treat that doesn't make me feel guilty for consuming extra calories and fat, but then, in truth that has never stopped me from eating up all the goodness.  This recipe excited me because I could see real possibilities with it, and HELLO~3 ingredients!
ALMOST GUILT FREE CAKE BATTER DIP
1 box (10.5 oz.) Funfetti Cake mix
2 c. fat free vanilla yogurt
1 c fat free frozen whipped topping, thawed
Graham Crackers, Nilla Wafers for dipping
(just pick whatever you like most!)

In a large bowl, combine the cake mix and yogurt.  Use an electric mixer to combine well.  Add in the thawed whipped topping, mix until everything is well incorporated.  Cover and chill for 2 or more hours.

That's it!  Serve with your choice of dipping items.

Note:  as this dip sat out, the little 'confetti' pieces in the cake mix started to "melt". Each time it was stirred, the colors seemed to streak through the dip.  I think kids would be over~the~moon happy with this dip! 


I served this dip at a Bunco game night with all my fun girlfriends to see what their opinions would be.  It was a thumbs up. It's addicting.  The more you eat, the more you seem to want (notice the Scooby Treats we used as our dippers, there were no graham cracker sticks at the store that day but it made for great commenting and laughter!).

I used a recipe calculator to figure the basic nutritional information for the recipe:
If you would like to check out the recipe calculator, you can find the link here: SPARKPEOPLE.COM

Nutritional Info
  • Servings Per Recipe: 30
  • Amount Per Serving
  • Calories: 70.2
  • Total Fat: 1.5 g
  • Cholesterol: 0.5 mg
  • Sodium: 103.0 mg
  • Total Carbs: 13.0 g
  • Dietary Fiber: 0.1 g
  • Protein: 1.2 g

The serving size was calculated at 4-5 Tbsp.
Think of the fun possibilities with this recipe-simply mix it up by using other cake mix flavors.  How about spice cake with gingersnap dippers?  Chocolate fudge cake with Nilla wafer cookies?  Strawberry cake mix with graham crackers?  Oh the idea's people will come up with...
Recipe source: The Pursuit of Happiness Blog


Pin It

August 17, 2012

Deep Dish Chocolate Chip Cookie-for 1

I am in heaven.  I found this DELISH recipe on Pinterest (where the recipe pin links to Angela's Adventures, a fun blog you should spend some time visiting)!
Anyway, back to this awesome cookie recipe...
For all those who know me, there are 2 kinds of cookies that I absolutely adore, Pumpkin Chocolate Chip, and your basic soft Chocolate Chip Cookie.  Love them. Sadly, I'm too lazy to make them. I'm seriously lazy.  So, unless a friend takes pity and drops some off to my needy/greedy self, I don't get to indulge in either cookie very often.
NOW I'VE FOUND THE PERFECT ANSWER TO HALF OF MY COOKIE DILEMMA! Here it is...
Unbelievably easy, and honestly very very delicious, this cookie recipe is now an absolute necessity for my sanity and general attitude about everything. -he-he-he

Deep Dish Chocolate Chip Cookie for 1
(don't share)
1 Tbsp. butter, melted
1 Tbsp. white sugar
1 Tbsp. brown sugar
3 drops vanilla extract
pinch of salt
1 egg yolk
1/4 c. flour
2 Tbsp. chocolate chips
  • In a bowl, combine the melted butter, white sugar, brown sugar, vanilla and egg yolk.
  • Stir with a fork until well mixed.
  • Add in the flour & salt.  Mix again.
  • Add the chocolate chips and stir until they are evenly distributed in the batter.
Spread into a ramekin, shallow bowl, or coffee mug.
Microwave for 40-60 seconds, or until the cookie no longer appears "doughy" in the center (my cookie take 60 seconds, in our 1100 watt oven).
(Don't over cook, because as the cookie cools it will become drier, and not as soft. This happened once, but hey, I had no qualms about eating it, and it was still fabulous.)
Cool slightly and dig in! 


This would be soooo good served still warm with a small scoop of vanilla ice cream.
~This takes me about 7 minutes to assemble and  "bake". Less time if I don't clean up behind myself! Ha Ha ~

Note:  I haven't tried to make the cookie in a mug, but I'm guessing that the cooking time may need to be increased because the dough is not spread out as thinly as in a ramekin or bowl.

Recipe source: Angela's Adventures Blog


Pin It

January 4, 2011

Cranberry Hooty's Cookies

This recipe is so fun to give as a gift. plus it makes really excellent cookies and has a beautiful presentation.
I gave this cookie mix away during the Thanksgiving holiday, again during the Christmas holiday, and plan do so for Valentines day as well...
Check out this link to see how I created my version...
Cookie mix in a jar idea's at Peg's Sister Sal's
Cranberry Hooty's Cookies
(cookie mix in a jar)

1 c. plus 2 Tbsp flour
1/2 tsp. baking soda
1/2 tsp. salt 
1/2 c. rolled oats
1/3 c. packed brown sugar
1/3 c. white sugar
1/2 c. dried cranberries 
1/2 c. white chocolate chips
1/2 c. chopped pecans (optional)


Combine the flour, soda and salt together. Layer the ingredients in a 1 quart jar in the order they are listed.


Attach a tag with these instructions:
Heat oven to 350 degrees F. Grease a cookie sheet or line with parchment paper.
In a medium bowl, beat together 1/2 cup softened butter, 1 egg and 1 teaspoon vanilla extract until fluffy. Add the entire jar of ingredients, and mix together until well blended. Drop by heaping spoonful onto the prepared baking sheet. Bake for 8 to 10 minutes, or until edges start to brown. Cool on baking sheets, or remove to cool on wire racks.

Makes 18 cookies.


I found this recipe here:  Cranberry Hootycreeks

October 10, 2010

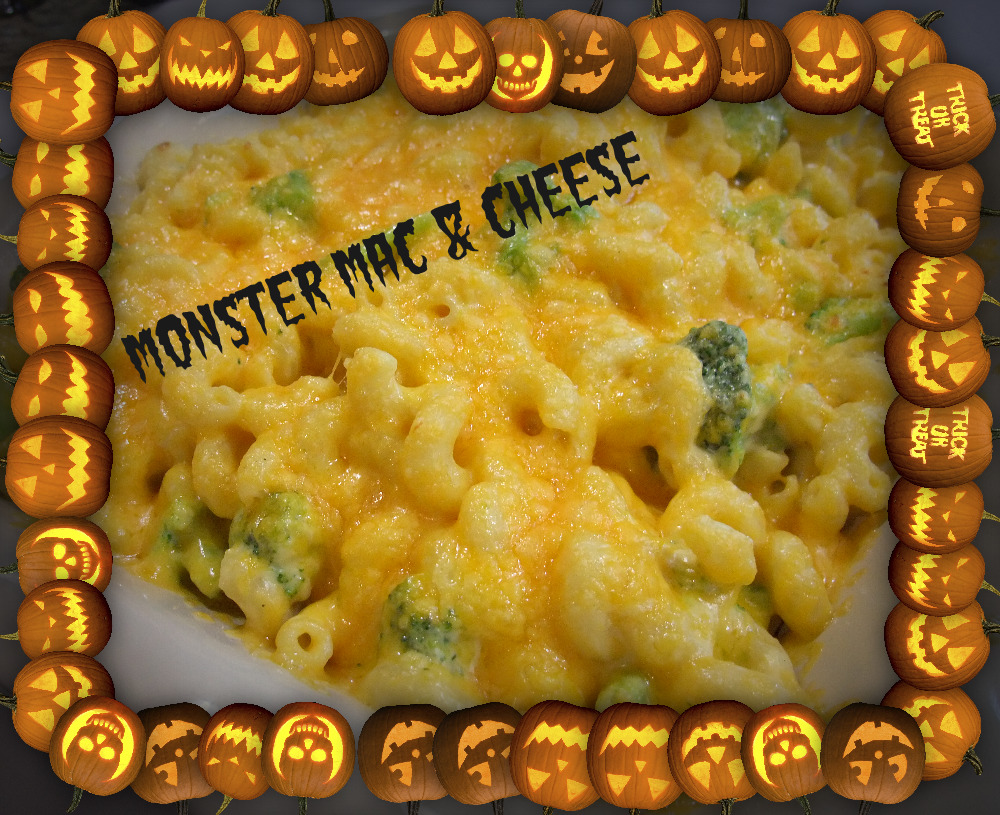
Monster Mac and Cheese

My family are big fans of Mac & Cheese!
Just for my family, on Sunday's for the next few weeks I will be posting one of their favorite Mac & Cheese recipe picks.

Disclaimer: Mac and Cheese is not my biggest love, but there are some really great recipes that just make you say YUM! 
 
This recipe is one that I made often for my kids when they were small, and I always made it at Halloween time. Any food with the word monster in it was sure to make them happy!  I don't really know why this dish is called Monster Mac, but adding green food coloring to the sauce would make my wee people giggle all through dinner 'cause they were "eating monster guts". Gross I know...

12 oz. Cavatappi pasta
10 oz. bag frozen broccoli florets, thawed
1- 16oz. jar Alfredo sauce
8 oz. cheddar cheese, shredded-about 2 cups
(I admit that I always add extra cheese)
1/3 c. milk
1 Tbsp. Worcestershire sauce
3/4 tsp. Italian seasoning spice
1/4 c. pepper
4-5 drops green food coloring (optional)
Coat a 2 qt. baking dish with cooking spray.  Cook pasta according to package directions, adding the broccoli to the boiling pasta during the last 3 min. of cooking time. Drain.
Meanwhile, position your oven rack to 4" from the broiler source, and preheat broiler on high.
Return the pasta/broccoli to the pot, and over low heat stir in the Alfredo sauce, milk, Worcestershire, seasoning and pepper. Add 1 c. shredded cheese. Stir until smooth and heated through.
Transfer the pasta mix to the prepared baking dish, and sprinkle with remaining 1 c. cheese. Broil until the cheese is melted and just starts to brown, about 3-4 minutes.
Tip: Don't rinse the pasta after draining it, the starch helps thicken the sauce a bit more.


(Now that my kids are grown, I just couldn't bring myself to color the pasta green...sorry!)
Special note: Cavatappi pasta is a large corkscrew pasta that I always use when making a recipe with a heavier sauce. Everything just clings to it so well!  However you can use penne, elbow, or rigatoni pasta in place of the cavatappi if you can't find cavatappi at your grocery store.

Pin It

August 28, 2010

FUN Saturday dinner with your kids

blog has the greatest idea's for making meal times fun.
This quick and simple tutorial will be such a hit with your kids,
and it's an easy prep meal for you!
Adorable!!

In keeping with our fun food theme we made these cute sloppy Joe cars. What do you think?
These were simple to make and will be a big hit with the kids.

You will need:
* Hamburger or ground turkey
* 1 can sloppy joe sauce
* hoaggy rolls (or you can use unsliced hot dog buns)
* zucchini or cucumber
* cherry tomatoes
* pretzel twists

We made sloppy joe filling. Super easy! I browned a pound of ground turkey (because I like to fool myself into thinking we're healthy around here) and then added a can of sloppy joe sauce. Easy peasy! But you can always make it from scratch. =o)

Then I hollowed out some of the roll. Super easy. I just cut out a rectangle and pulled out the bread.

Then fill 'er up with sloppy joe stuff.

Don't forget to add a steering wheel!

Then add on some wheels and headlights with toothpicks and you are set!


What a fun meal idea!Thank you to the amazing Erin for this creative tutorial~we believe you will never create too many great memories with your children, so start now with this excellent idea! We love it!

August 10, 2010

Books & Cooks

I found this great books & cooks idea over at the
Link on over and read the great book review and cooking idea!
What a great idea!
We want one of you great followers to create a book club that revolves around this idea...the members read the book during the month, then the hosting member makes a dish that relates to her, using the inspiration from that book! Everyone meets for the book discussions, and enjoys the dish, along with the reason why that dish connected with the book.
Awesome fun, great books, great friends, great food, great idea's, great times!!!!!

Please invite us to join the book club as soon as you get it organized.  We are too dis-organized to arrange for this ourselves...
;}

August 4, 2010

~*~THE TASTY KITCHEN!~*~

Hey Hey Everyone!
I NEED to say a few things about this blog/website I found while blog hopping through the food blogging world.


I recommend adding this to the blogs you follow, or bookmarking the site, cause it has awesome recipes. Everything from simple to gourmet, the site is easy to navigate and you WILL find whatever  your are looking for, give you great idea's, and make you want to cook!
Here is a link to one recipe that someone should make and then send to me for an honest critique!!!   ;)

And here is the related blog post...
(really, I need these...badly...intensely...take pity on me!)
Anyway, I hope you like this site as much as I do!!
You can find the Tasty Kitchen button on the right hand side of this blog too!