February 27, 2013

Sesame Chicken Pasta Salad

This is a recipe you will thank me for.  I mean it is DELISH
My adorable neighbor Brittany brought some by just a couple of weeks ago and I fell in love.  In fact, I obsessed about it for days, I talked about it, I might have even dreamed about it. Brittany gave me the recipe link, and I started right in trying to feed my need (ha).  I have made this recipe several times already, and EVERY time, it is THE hit at the party or event I've taken it to.
It's very simple to make, and the ingredient list is easy too, plus this dish earns bonus points because it goes together in a jiffy.
One note;  be sure to give yourself extra time to allow the salad to chill and soak up the dressing, at least 4-5 hours before serving, and the salad is even better the next day!

Sesame Chicken Pasta Salad

Dressing:
1/4 c. sesame seeds, toasted
1/2 c. vegetable oil
1/3 c. soy sauce
1/3 c. rice vinegar
3 Tbsp. sugar
1 tsp. sesame oil
1/2 tsp. ginger, fresh or ground
1/4 tsp. black pepper

In a large bottle with a tight fighting lid, combine all the ingredients, seal, and shake until everything is incorporated.
  Salad:
1 (16 oz.) package rotini, bow tie, or other pasta.
3 c. cooked chicken, chopped or shredded
1/3 c. chopped fresh cilantro
1/3 c. chopped green onion

Cook pasta according to package directions until BARELY al dente, the pasta will continue to soften as it is chilled and soaks up the dressing, so you don't want it to be too soggy.
Drain the pasta and rinse under cold water until the pasta is no longer warm  Let cool completely. Once it is cooled, you may need to give it a very quick rinse to make sure the pasta isn't sticking together, then drain very well.
In a large mixing bowl place the cooked pasta, chicken, cilantro and green onion.  Give your dressing another good shaking up and pour over the pasta mix.  Stir until ALL of the pasta mix has been coated with the dressing.  Cover.  Place in the fridge to chill.  At this stage the dressing will not be absorbed and quite a bit will sit in the  bottom of the mixing bowl.  Occasionally stir the pasta salad and the dressing will eventually all be soaked in. Don't skip this step, it makes all the difference!
Sprinkle with additional sesame seeds and chopped cilantro before serving if desired.


Note:  I am not a big lover of cilantro, so I split the 1/3 cup measurement that the recipe calls for and used flat leaf parsley that I had chopped up in combo with the cilantro.
Also, the original recipe explains how to toast the sesame seeds, but I skipped that step and bought them already toasted!  Check with your local bakery, because they will often sell you a larger quantity for less money than the seeds you find in the spice isle.

Recipe Source:  ~BRITTANY DAW~, via AllRecipes.com

Pin It

February 12, 2013

Lovers' Brownie Decadence Bars (aka slutty brownies)

When I first saw this recipe my mouth watered just reading the ingredients!  I love brownies, chocolate chip cookies, and Oreo Cookies! 
I think this would be such a wonderful dessert for Valentines Day or for any  occasion with that special someone.
The original recipe in written to make the cookie dough and brownie layers from scratch, but yaaaaaa, I'm too lazy to actually do the extra work when I can see super simple shortcuts.  I'll post my version of this delicious treat here and provide you the link to the original recipe at the bottom of this page.
Enjoy!
Lovers' Brownie Decadence Bar's 

1 (18.5 oz.) box brownie mix (family size)
~plus the ingredients to make the batter
1 (15.5 oz.) package Oreo Cookies
1 roll Refrigerated Chocolate Chip Cookie Dough

Preheat oven to 350 degrees.
Lightly coat a 9 x 13 pan with non-stick spray if you are using the smaller box of brownie mix, use an 8 x 8 pan).  Make brownie batter according to package directions.  
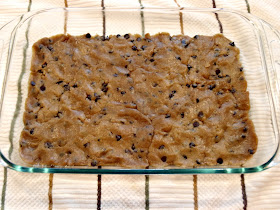
Unroll the cookie dough and press on the bottom of your prepared baking dish.
Next layer the Oreo's on top of the cookie dough, try to cover as much as possible, but don't stack on top of each other.
I used about 30 cookies for 9 x 13 pan
Pour the brownie batter over the top of the Oreo's, spread to evenly cover.
Bake for 30-35 minutes.  You can test for done-ness (I think I made this word up) by inserting a knife or toothpick in the center to see if it comes out clean.  I like the bars a tiny bit under baked for a little creamier texture if I'm serving with ice cream, so I bake them for just 30 min.

Allow to cool for 30-40 minutes before cutting.
If you cut the bars while they are warm you will really need to place them on a plate and eat with a fork,
not~a~sacrifice~lol, because they are very soft and break apart so easily.
To make these bars an absolutely ultimate dessert, serve with vanilla ice cream~  Woot!

Recipe Source: TastyKitchen.com


Pin It

February 9, 2013

Cookie Dough Truffle Bites and Perfect Dipping Chocolate Recipe

Every person I know has a small guilty pleasure-eating chocolate chip cookie dough...it's just so good! 
This recipe is one of those marvelous Pinterest finds, is  quick to put together, and has just 5 ingredients!  You gotta love that!
It's a great treat for a girls night out, a get well basket, bridal shower, or a thank you for that special friend!
These truffles taste just like chocolate chip cookie dough but are safe to eat without worry of food poisoning from raw eggs.  They freeze really well, so you can make a batch and enjoy a few every day! Just let them sit out for 10-15 minutes before inhaling them!

COOKIE DOUGH TRUFFLE BITES

1 c. butter, softened
1 1/2 c. packed light brown sugar
1 tsp. vanilla extract
2 c. flour
1 c. miniature chocolate chips
1 1/2 c. Perfect dipping chocolate (optional)
(see the recipe below)

In a large mixing bowl cream the butter and sugar together until light brown and fluffy.
Add remaining ingredients and mix very well.
Roll the dough into 1" balls (about the size of an un-shelled walnut). I started out rolling the bites by hand, but with time pressures, I switched to a cookie dough scoop to speed up the process.

Refrigerate until firm, 30 minutes or longer (I left mine overnight because my schedule got too tight to finish all at once, and they were absolutely perfect).
At this point they are ready to eat, but you can also drizzle melted chocolate over them, or dip them in a delicious chocolate coating..  I've made these a couple of different times, and I like them all three ways-plain, drizzled, and dipped!
I've added my recipe for homemade dipping chocolate (that tastes so much better than chocolate candy coating) below.


PERFECT DIPPING CHOCOLATE


1 1/2 c. semisweet chocolate chips (use pure chocolate chips)
2 Tbsp. Crisco shortening (no substitution)


Directions:
Remove the chilled candy from the refrigerator about 10 minutes before coating (dipping cold centers can result in cracked coating).
Place the chocolate chips and shortening in a 2-cup measuring bowl.

Place in the microwave and on 50% power, heat for 30 seconds, stir gently, and repeat the process until the chocolate is melted and smooth.  Stir and stir between heating times because the chocolate may appear un-melted, but it will surprise you how quickly it smooths out (do not use butter, margarine or oil).
If you are unsure of using this method, here are the original directions for this recipe I've had for years.
~Place the bowl into a larger bowl which contains very warm water (about 100-110 degrees) the water should reach only halfway up the 2-cup bowl with the chocolate (DO NOT LET EVEN 1 DROP WATER MIX WITH CHOCOLATE!).
Stir mixture constantly with a small spatula until the chocolate is melted and the mixture is smooth (this should take about 16-18 minutes).
If the chocolate becomes too thick for dipping, place the bowl containing the chocolate over the top of a bowl that has very hot water in it.  Stir until the chocolate has thinned back to the consistency you want.~
This method is obviously a pain, so you can also melt the chocolate in a double boiler, which is far easier-lol.
TIPS ON HOW TO WORK WITH DIPPING CHOCOLATE.
Avoid all types of moisture when melting the chocolate, any steam or drops of moisture can cause the mixture to "seize" or become very firm, crumbly and grainy.   If this occurs it can be corrected by stirring in 1 tsp. shortening for each 2 ounces of melted chocolate.
Store the chocolate tightly wrapped in a cool dry place, do not refrigerate.
Recipe source for the cookie dough bites: DisneyFamily.com

Pin It

February 5, 2013

LOUISIANA- Yummy Pecan Pralines

This recipe is #23 in OUR COOKIE NATION series.
I have to admit that this particular recipe was a real challenge for me.  I made it 3 times before it turned out like it should have.  I found that the original recipe directions weren't working for me, and I'm not sure why.  Maybe the altitude I live at (4500 ft.) makes a difference or some other little thing I'm not aware of, but whatever it is, the 3rd time was the charm!

Once I had finally figured out the changes I needed to make, it became a pretty simple recipe, so I encourage you to try these!

Yummy Pecan Pralines
1 c. packed brown sugar
1 c. white sugar
1/2 c. evaporated milk
(not sweetened condensed milk)
2 Tbsp. butter
1 1/4 c. pecan halves
1/4 tsp. vanilla extract

Generously grease a large baking sheet (I simply used non-stick spray).
In a large sauce pan with a heavy bottom (or dutch oven style pan), combine the the white and brown sugars with the milk.
Bring to a boil.
Stir in the butter, pecan halves and vanilla.
Heat WITHOUT STIRRING to soft ball stage (234 to 240 degrees) be sure to use a candy thermometer.

AT THIS POINT I CHANGED THE DIRECTIONS TO WORK FOR ME~here is what I did;
Remove from heat and cool about 2 minutes.
Stir the candy just to make sure everything is combined, then drop by teaspoonfuls onto the greased baking sheet.  The candy will spread very slightly.  Repeat until the syrup has all been used, but work quickly, this candy will start to set up rather fast. 
Let cool completely then store in a covered container.

ORIGINAL RECIPE DIRECTIONS:
Remove from heat and cool 5 minutes.
Beat until thickened, then pour immediately onto the prepared pan and let rest until firm and completely cool before cutting into pieces.

The first 2 times I made this, as I was beating the candy, it would crystallize before I could even get it onto the baking sheet, and then would harden up to the point that you couldn't really eat it {however, I did give it the good ol' college try, and it tasted wonderful}. This is the reason I skipped the 5 minutes of mixing in the directions.
As the candy cooled it lost its bright shine and became more opaque, like the candy in the original recipe photo.  The pralines were delicious and a little chewy, like a caramel.
Good candy-I have no idea why AllRecipes.com considers this a "cookie" in their list-ha ha ha.
Recipe Source: AllRecipes.com

Pin It